IH Cub Cadet 582 Special

An International Harvester garden tractor: engine teardown, a rebuilt driveshaft yoke, and a replacement 18 hp twin.

Last updated 7/2/2006 · Click any photo for the full-size picture

The Cub Cadet 582 Special

The Cub Cadet 582 Special

Here is the new International Harvester Cub Cadet 582 Special s/n 2050596U690855, with a 44C 44 inch mower deck s/n 0320020U142248 that I picked up. It has a twin cylinder 16HP Briggs & Stratton gas engine, manual 4 speed transmission, and electric PTO clutch on the engine crankshaft. I got a heck of a deal on this tractor.

Front view

Front view

Front view.

Another view

Another view

Another view.

Another view

Another view

Another view.

Yet another view

Yet another view

Yet another view.

One more view

One more view

And finally, one more view.

Operator controls

Operator controls

Picture of the operator controls.

Carburetor and high-speed needle

Carburetor and high-speed needle

I pulled the air cleaner assembly off to have a look at the carburetor. The engine is very cold blooded, and it turns out the high speed needle adjustment was totally out of whack. Set both it and the idle mixture screws at 1-1/2 turns from seated. It ran better, but still does not like to run when cold. More troubleshooting is needed.

My wife mowing

My wife mowing

Here's my wife taking it for a spin around the lawn. It cuts nice, but doesn't have nearly the vacuum power in the mower deck like my AC716H.

My turn

My turn

My turn.

With the AC 716H

With the AC 716H

The Cub outside with the AC716H.

Heads off: a mess inside

Heads off: a mess inside

After noticing that it just doesn't seem to have much power for a twin cylinder 16HP engine, I pulled the heads off and found this delightful mess. Time for a teardown/bore/rebuild job.

Cooling shrouds removed

Cooling shrouds removed

Here is the engine with the external cooling shrouds removed. The Briggs & Stratton engine is model 401417, Type 0145, Code 80100812.

Bare tractor, engine out

Bare tractor, engine out

Bare tractor with the engine removed.

Sloppy driveshaft yoke

Sloppy driveshaft yoke

Another issue that reared its head is the fact that the rear driveshaft yoke is very sloppy on the bevel gear box and will have to be repaired.

Engine on the bench

Engine on the bench

Here's the engine up on the bench.

External parts removed

External parts removed

The engine with most of the external parts removed.

Homemade flywheel puller

Homemade flywheel puller

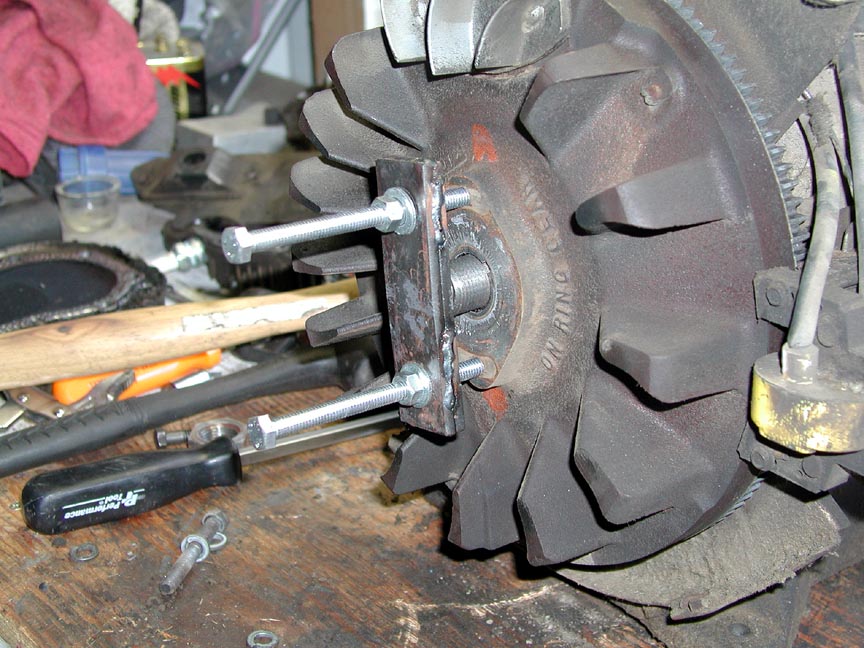
Using a homemade flywheel puller. After putting some tension on the bolts, a sharp rap on the puller with a hammer popped the flywheel right off.

PTO cover off

PTO cover off

The PTO engine cover is off here showing the crank and camshaft.

Crankcase with the base removed

Crankcase with the base removed

Picture of the crankcase with the base removed. You can see the single oil slinger on the front connecting rod. The rear rod and piston is already out.

The crankshaft

The crankshaft

The crank, in all its glory. Appears to be a rather sturdily built item.

Down to the valves

Down to the valves

All that's left in the block at this point are three of the valves. I have a small engine valve spring compressor on order to pull them.

Update · 7/2/2006
Tracking down the vibration

Tracking down the vibration

While the old engine was still installed, I noticed a lot of vibration coming from the tractor but chalked it up to the engine dying. I happened to pull the gear shift cover off with the engine idling and noticed that the driveshaft had a serious wobble in it. The yoke that fits over the bevel gear box had come loose some time ago and the bore had started to go egg-shaped.

Aluminum fixture for the yoke

Aluminum fixture for the yoke

I turned a piece of aluminum bar stock to be a light slip fit into the yoke where the bronze support bearing goes and then drilled and tapped a hole in an aluminum plate and bolted the aluminum locating ring to it.

Yoke bolted to the fixture

Yoke bolted to the fixture

After drilling and tapping two more holes for the hold-down bolts, you can see the yoke bolted down.

Faceplate on the Rockwell lathe

Faceplate on the Rockwell lathe

Here I have a faceplate mounted on my Rockwell lathe. Before bolting down the yoke holding fixture, I had to machine two notches for the bolts to fit in so that the bolts pulled the plate up tight and kept it flat.

Boring the yoke

Boring the yoke

Using a boring head from a friend of mine, you can see the boring operation about half way completed here. The boring head had a tapered shank so I wasn't able to use it on my milling machine. On the boring head, there is an allen-head micrometer adjustment that you can accurately adjust the offset of the tool and hence its depth of cut. I took about five passes to creep up on the final diameter I wanted.

Six-jaw chuck back on

Six-jaw chuck back on

After the boring job was completed, I removed the face plate and put the six-jaw chuck back on. By not removing the yoke jig yet, I can precisely put the face plate back on (it goes on using an L00 taper) if I need to re-bore the yoke. Here I'm turning a piece of heavy-wall pipe to make a sleeve for the yoke.

Machining the sleeve

Machining the sleeve

On my second attempt at machining the sleeve to be a precise press fit in the yoke (I seriously need to buy a good set of calipers), you can see both parts ready to go together.

Sleeve retainer and press fit

Sleeve retainer and press fit

I cleaned both parts well with carb cleaner and coated the sleeve and bore of the yoke with Permatex high temp Sleeve Retainer that's designed to hold bearings in worn bores. It has something like a 4,000psi shear strength and I figure that coupled with a new roll pin should keep the yoke from coming loose on its own in the future.

Roll pin redrilled

Roll pin redrilled

After letting the sleeve retainer adhesive cure for 24 hours, I redrilled the roll pin hole in the yoke oversize, used an air drill to do the same to the bevel gear box input shaft (the steel in the shaft is VERY tough), I pounded in the roll pin using a sledgehammer as a backup to keep the pounding forces off of the shaft bearings.

A replacement 18 hp engine

A replacement 18 hp engine

I was able to locate an 18HP Briggs flat twin that is almost identical to the original 16HP engine and purchased it from a fellow back east. UPS managed to do a nice job of breaking off two of the engine mount feet but I was able to used the oil pan off of the old engine without problems. Here I'm machining down the sleeve in the old fan as it didn't fit up quite right on the new engine and I couldn't use the fan off the new engine as the driveshaft wouldn't bolt up right.

New engine installed

New engine installed

Here is the new engine all installed. The fan draws air from under the fuel tank area, forces it through the engine, and out the front, helping to keep the muffler cool and contain underhood temperatures. With the side covers on, the engine bay is pretty enclosed.

Running again

Running again

After pulling the carburetor off and replacing the points and condenser, the engine fired right up and purred nicely. I've noticed that flat twins such as this don't run quite as smooth as V-twins. After two years, it's so nice to have this tractor back together.

Washed and ready to roll

Washed and ready to roll

All washed, polished, and ready to roll.

IH Cub Cadet 582 Special photo 1
IH Cub Cadet 582 Special photo 2
IH Cub Cadet 582 Special photo 3